Basically in order to successfully install an SSL certificate you need the following things
- CSR file
- Private key
- Certificate key
- Certificate chain
Download Certificates
If your website is hosted through GoDaddy (e.g. the primary domain on a GoDaddy shared hosting account, Website Builder), you don’t need to use these instructions; GoDaddy take care of the SSL installation for you.
- On your SSL certificate home page, click Download.
- Not in your SSL control panel? Log in to your GoDaddy account.
- Click SSL Certificates.
- Complete step 1 above.
- Select the Server type you want to install the certificate on.
- Click Download ZIP file.
Prepare Your Server
The first step to installing your certificate is to prepare your server directories to hold the final keys later on.
So ssh into your server and do the following
sudo mkdir /etc/apache2/ssl
chmod 700 /etc/apache2/ssl
chown www-data:www-data /etc/apache2/ssl
Then to be sure, do the following to install openssl. Nothing will happen naturally if openssl is already installed.
sudo apt-get install openssl
Then install the required ssl mods for your apache instance and activate them
sudo a2enmod ssl
Generate the CSR
In order for GoDaddy to be able to issue our SSL certificate, we need to generate the CSR (Certificate Signing Request) key and our Private Key. In your home directory, do the following. You don’t need to do sudo at this point.
openssl req -newkey rsa:2048 -nodes -keyout example.com_ssl.key -out example.com_ssl.csr -sha256
After running the above command you will be required to answer some identity questions. Make sure you answer them as accurate as possible. The questions will look like something below.
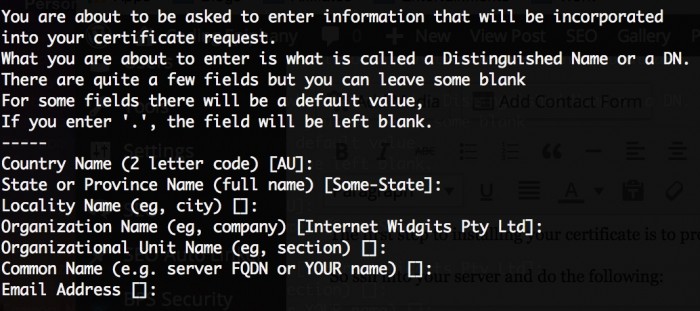
You don’t really need to use the challenge password with GoDaddy at the time of this writing.
Now that you have completed generating the private key and the CSR, it’s time to send it through to GoDaddy.
Generate the Secure Certificate
Open the example.com_ssl.csr that we generated before. You can use vim or you can simply cat it to the terminal. The CSR should look like this:
-----BEGIN CERTIFICATE REQUEST-----
MIICijCCAXICAQAwRTELMAkGA1UEBhMCQVUxEzARBgNVBAgTClNvbWUtU3RhdGUx
ITAfBgNVBAoTGEludGVybmV0IFdpZGdpdHMgUHR5IEx0ZDCCASIwDQYJKoZIhvcN
AQEBBQADggEPADCCAQoCggEBAKMZ0czj18lWf2v2C0sl7mYVLn732G0/Pa/N3/yp
DwdHmfkmDbRG5xDo2AQ7VzIWpXnzsz9hNhLSJx1kcwBX7N7/CAQnMYLpDm5TUYs0
x8l5yhvXBn/QSA1ItaT2hgWixlml8zuzlucCfc6gnu+g4Bef95o1yE218AZQV1Pl
JooiHqsDycetfl/7KEw10hfRjV8TX+vDcBUkJ/BubyPYEf1j3dbDqlUGGXco1AB1
xiMbfFTU20uzvpaPz333vj64uKMr/+rFkso0bHy1LaLYVQCAoYhGj7SbveB5qbtO
AkgsYKCfLbatmyBrSB2gKFbyNlRj1AH3E7NeNrkXdVcSrH8CAwEAAaAAMA0GCSqG
SIb3DQEBCwUAA4IBAQBxWB4NHv7JtcxcyTmwTDizUG/cf0vlyZSz/mvgTUI5Vgbr
jJsRe7d/xyIKTKpp4uhl1J96CE8Qhqy7dezEht7Y7iluzJBJV8RRuHvBc1YKBFd+
Py5AVZwmgpdwPDj83/+yD4vuJdsBkAxCUflWzuQ35zEucCwwlcDbl/r1PJae0UdC
mYF09YImve2G7dHvvi/hQ7AEUbaxnAX0u53HZBELJF41bW1eoInsaxnEMNMvfl/1
xoxmfaCZiKXZWDHB+7sw3YRyxbZ7E0kwLx7xENH3FpbFCADJehLvacPA8obzsqWV
sWVG1SDyNqrPbyFlwsTcJjkM8CfvIbE93Z5A/A0A
-----END CERTIFICATE REQUEST-----
So copy the entire content from your CSR file, including the —–BEGIN and END.
Then login to GoDaddy, locate your secure certificate product and click launch. After that, click on setup and choose provide CSR. Then paste the content of the CSR file that you just copied previously.
When done, just wait until GoDaddy verifies your website’s identity and grant you access to download the certificate, in my case this happens very quick, at most within 10 minutes.
Installing the Certificate in Your Server
Once GoDaddy email you that your certificate has been generated, follow the link and download the certificate to you computer for now. Basically it’s a zip file containing 2 files, the one that looks like a randomly generated hash is your secure certificate (let’s call it 7abca5c1b8.crt for this article), while the one that starts with gd_bundle_ is your certificate chain file.
So upload both files to your home directory in your Ubuntu server instance. You should now have the example.com_ssl.key, 7abca5c1b8.crt, gd_bundle-g2-g1.crt. Then move those 3 files to the ssl directory that you created previously.
Then make sure you set the correct permission to those files.
Create the Apache Configuration
In this article, we’ll assume that we are using the 000-default.conf file. This file is normally located in your /etc/apache2/sites-available/ folder.
So make a copy of this virtual host configuration file and call it 000-default.https.conf
sudo cp /etc/apache2/sites-available/000-default.conf /etc/apache2/sites-available/000-default.ssl.conf
Then open the file in your favourite editor such as VIM and make the following changes.
First, update the port in the VirtualHost opening tag.
<VirtualHost *:80>
 to
<VirtualHost *:443>
Secondly, add the SSL rules at the beginning of the file, just after the opening tag. Please pay attention of the cipher suite rules as this is the combination that I found to be most acceptably secure at the moment.
I am no security expert of course, this secure combination was found from this website and when you finish setting up your website SSL you should test your site against attacks too. One of the websites that you can use is SSLlabs.com.
<VirtualHost *:443>
        SSLEngine On
        SSLProtocol All -SSLv2 -SSLv3
        SSLHonorCipherOrder on

        # Prefer PFS, allow TLS, avoid SSL, for IE8 on XP still allow 3DES
        SSLCipherSuite "EECDH+ECDSA+AESGCM EECDH+aRSA+AESGCM EECDH+ECDSA+SHA384 EECDH+ECDSA+SHA256 EECDH+aRSA+SHA384 EECDH+aRSA+SHA256 EECDH+AESGCM EECDH EDH+AESGCM EDH+aRSA HIGH !MEDIUM !LOW !aNULL !eNULL !LOW !RC4 !MD5 !EXP !PSK !SRP !DSS"

        # Prevent CRIME/BREACH compression attacks
        SSLCompression Off

        # Commit to HTTPS only traffic for at least 180 days
        Header add Strict-Transport-Security "max-age=15552000"
Now that you have added the rules for the SSL settings, you then need include the paths to the three keys that you setup before. So just after the rules above, add the following lines.
SSLCertificateFile /etc/apache2/ssl/7abca5c1b8.crt
SSLCertificateKeyFile /etc/apache2/ssl/example.com.key
SSLCertificateChainFile /etc/apache2/ssl/gd_bundle-g2-g1.crt
That’s it, you just need to enable the secure configuration by using the a2ensite command
sudo a2ensite 000-default.ssl.conf
Lastly restart your apache server just to be sure.
sudo service apache2 restart
If you faces “headers” error that means headers does not exist. Try following commands to generate headers.
cd /etc/apache2/mods-enabled
sudo ln -s ../mods-available/headers.load
sudo /etc/init.d/apache2 restart
Closing
So that’s it. After following the instructions above, your server should now support https and you’ll get that secure lock on the browsers. Hopefully this article helps those using GoDaddy certificate and Ubuntu server.
If you have more information to improve this instructions, please by all means leave some comments so that we all can learn 🙂